In this series of blog posts I'm going to record day-by-day from start to finish, exactly how I paint a full set of nesting dolls. Before we start - a few things must be taken care of.
Firstly, the designs. This 8 doll set will feature characters from the Disney animated film Moana. I actually did the drawings a few months ago, and then refined them quickly the week before I started painting. Normally I would digitally colour my pencil sketches, but to save some time for this set I decided to reference the coloured screenshots from the film whilst painting.
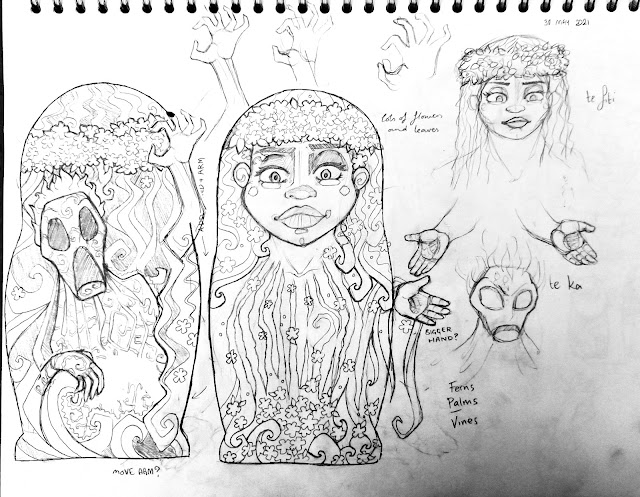 |
| Design for Te Fiti / Te Kā, the largest doll |
| Design for Tamatoa, the 2nd largest doll |
Next, I sanded the blank wooden nesting doll set (outside with a mask), and then painted 3 coats of white gesso on each doll - top and bottom pieces apart for this to avoid any sticky situations!
 |
| Blank set ready for gesso |
Here's a quick run down of my favourite materials list (not sponsored but totally could be if any of these brands wanted me to, I really recommend them all!
- Gesso - I use a big tub of Winsor & Newton Galeria White Gesso.
- Paint - my go-to has always been Daler Rowney System 3 Acrylic Paint, although I haven't been able to find it recently in my area, so I have started topping up with Polycolor from my local art shop, which has been just as good (maybe even better)!
- Varnish - for the very final touches. I use Liquitex Matte Acrylic Varnish - I previously used a bog standard gloss varnish from a DIY store but I much prefer the matte finish Liquitex provides.
So with all of the preparations done, it's time to start painting!
DAY 1 - 4 hours
I often start painting from the smallest doll and work my way up to the largest, but this time I wanted to get the hardest part done first so I started with the big doll. This doll features Te Fiti, a giant green earth goddess on the front with her angry lava-based alter-ego Te Kā creeping around the back. I always start by painting the face, and then the hands. Hands are a big challenge that I have learned to enjoy. So my progress at the end of day one and around 4 hours of painting in is - a disembodied floating green face and hands, plus the same in red for Te Kā on the back. Tell me, do you think I am a slow painter, or is this worth 4 hours of painting??
 |
| End of Day 1 Progress - Front |
 |
| End of Day 1 Progress - Back |
DAY 2 - 3 hours
Today was quite a frustrating painting day, I was working mostly with green and yellow paint which in general doesn't have great coverage so lots of layers are required. The result is that everything looks terrible, and I just have to keep trusting that eventually it will start looking ok.
I got down all of the background base colours, and some rough hair swirls. I am happy with my progress at the end of the day even though at this stage the doll looks very rough. Tomorrow will be spent neatening up the curls and leaves. I estimate that I am now at the halfway stage for this doll, and from here I will keeping refining the details. I'm not sure how common my painting technique is - I tend to start very rough and then keep adding more layers, cleaning up the shapes until I'm done. I'm least happy with the front and will work hard to fix that tomorrow, the back is looking more promising!
 |
| End of Day 2 Progress - Back |
 |
| End of Day 2 Progress - Side |
 |
| End of Day 2 Progress - Front |
DAY 3 - 3 hours
Today was spent tidying up the hair. I decided to remove the ears to fit the original character design better. This stage involved painting loads of layers of paint a Again, I was working with yellow and green paint which I find difficult, but at the end of the day I am nearly done with all of the green elements! Next, I will add flowers and leaves, and also tidy up the lava at the rear - add some more flames and 'heat'. The end is in sight!
 |
| End of Day 3 Progress - Front |
 |
| End of Day 3 Progress - Back |
 |
| End of Day 3 Progress - Side |
DAY 4 - 2 hours
As you will see from the photo below - day 4 was a flower-painting day! I think the addition of flowers helps this design a lot. I have been struggling with self doubt whilst painting this largest doll, not really liking how it was looking. Honestly, when I first envisioned a Moana nesting doll set I did not want to include TeFiti - instead I wanted to symbolize her presence with a 'Heart of the TeFiti' smallest doll (I did the same with my Book of Life nesting dolls - representing the Candle Maker with a small central candle). TeFiti's character design in the film reminded me too much of the Comfort laundry detergent mascots, I was much more interested in the other (in my opinion) more engaging character designs. However, with a set of 8 dolls instead of 7 I decided to include her after all. Now I am really struggling with this doll, however I think one more day of painting and it will be complete! I am very excited to move on to some other designs.
 |
| End of Day 4 Progress |
DAY 5 - 3.5 hours
Finished! I used this final day to refine the flowers, leaves and vines, as well as the lava. This doll was a real struggle to paint, with all of the yellow pigment and flower details. I am fairly happy with the finished result, maybe it looks a bit too messy, but I am glad to have a complete finished doll. I am looking forward to painting the rest of the set next!
 |
| Finished - Front |
 |
| Finished - Back |
 |
| Finished - Side |
I'm busy working on the next doll in the set so stay tuned for Part Two! I recorded a video of the painting process so far that you can watch here:
Comments
Post a Comment